Connecting MySQL Database PHP
In the previous tutorial, we looked into some basics of MySQL and created a new database with a new table. But a database is of no use until we cannot use it within a web page. This tutorial will solve the problem. We will connect a database to a web page and will see how we can modify the database while staying in the code of PHP. Let’s start
Making a Connection to MySQL Database
MySQL requires a username and a password in order to establish a secure connection. Since we have not changes our username and password hence we use the default values. So let’s create two variables with user name “root” and password “”. We also need another variable with server details. Place the value of localhost in this variable. With all these values now we can request a connection,
$connection= new mysqli($server, $username, $password);
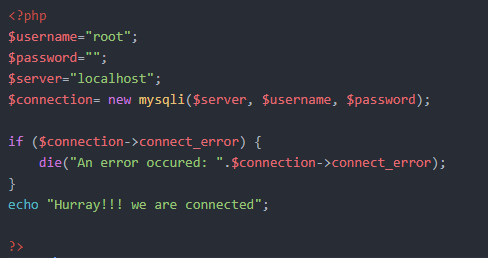
This will establish a connection with the MySQL. But how can we make sure that connection has established? Copy these lines as well and place them below other lines.
if ($connection->connect_error) {
die(“An error occured: “.$connection->connect_error);
}
echo “Hurray!!! we are connected”;
Finally the code will like this

 This will let you know the status. Just like this
So right now we are connected with our MySQL Database. Let’s take another step forward and change in a database.
Executing a query of MySQL in PHP
Write your query which you need to be executed in a string and save it in a variable let’s say $sql. Now use a function mysqli_query() with two arguments, one $connection that we created early and second one will be the $sql. This function will return the answer in Boolean if it executed well it will return true and otherwise false. Hence we can use this in an if statement.
$sql= “use PHP;”;
if(mysqli_query($connection, $sql)){
echo “Operation Succesful”;
} else{
echo “Error occurred”;
}
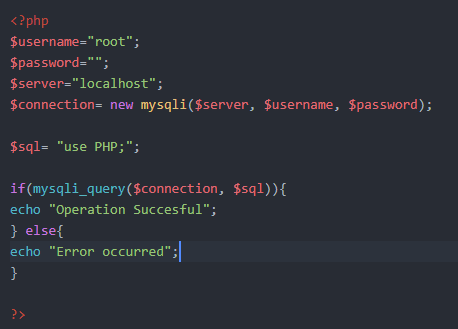
Whole code will become
 It was not expected any code from this code to show results it was just a user command. Hence only result visible is our echo
 But with this operation successful printing, we know that we are directly connected to our database and can perform any operation we want. So our task is complete. In previous tutorial we created a table inside the database PHP, let’s insert some values inside it. Remember the syntax of that table?
Inserting Data into a Table
Here we insert our first row of data in this table. To do this a command of INSERT. First, we write the keyword INSERT following with INTO keyword and then the table name. After that, inside of “values()” we put all the values comma separated. Let’s implement
INSERT INTO mytable values(“PHP Lover”, 20, “MySQL is fun”);
 Run this script and it should be the output
 It seems our desired values are now successfully inserted. We can verify it by running this query in MySQL command line. Select * from mytable; It will output all of the data inside this table.
 We will end our tutorial while discussing some of the important queries available.
Deleting a Table
DROP TABLE TableName;
Delete a Database
DROP DATABASE nameOFDatabase;
Search for an Entry in a Table
SELECT * FROM TableName WHERE (ColumnName=entryYouWant);
For example, SELECT * FROM mytable WHERE(age=20);
Delete an Entry from a Table
DELETE FROM TableName where(ColumnName=entryYouWant);
Update a Value in a Table
UPDATE TableName SET Column1=Value, Column2=Value, Column3=Value where(ColumnName=entryYouWant) ;
In some of the above examples, there is a where statement used, It performs a search in a table. The result can be consist of a single row or multiple, depending upon the data available in that table. To make sure you are getting the exact result what you need, use ‘AND’ between two checks.
Final Words
So this was another article in the journey of PHP learning. I hope this will help you a lot. Do send your suggestions using comments. In next tutorial we will get an overview of Forms in PHP. Stay connected stay blessed.
Part One: HOW TO RUN YOUR FIRST PHP SCRIPT ON WINDOWS
Part Two: BASICS OF HTML5 ON THE WAY TO PHP LEARNING
Part Three: PHP WORKING WITH DATA TYPES AND VARIABLES
Part Four: IF ELSE STATEMENTS AND ARITHMETIC OPERATIONS IN PHP
Part Five: TUTORIAL ON TYPES OF LOOPS IN PHP – PHP LOOP TYPES
Part Six: INDEXED AND ASSOCIATIVE ARRAYS IN PHP
Part Seven: FUNCTIONS IN PHP
Part Eight: INTRODUCTION TO MYSQL
Part Ten: FORMS IN PHP – PHP FORM EXAMPLE WITH DATABASE
Main Image Source : Pixabay
Also See : Shooting RAW – Photography Tutorial


